tl;dr
I grouped together a number of high-powered cloud-based computers to see if I could analzye more chess positions per second than Deep Blue. Turns out that was not as hard as I thought and I was able to analyze over 700,000,000 chess positions per second! This “supercomputer” would cost about $13/hour to run.
This post talks about how I did that, including all the setup steps.
First, a Definition
Just to get it out of the way, I’ll be talking a lot about the number of “nodes per second”, or NPS, that a system can process. This is the number of chess positions the engine considers in 1 second. This is also abbreviated where 1,000 NPS = 1 kN/S and 1,000,000 NPS = 1 MN/s. 42,000,000 NPS = 42,000 kN/s = 42 MN/s
Just for simplicity, I’ll be using MN/s for this article.
You can read more about NPS from Chessify. Speaking of Chessify, they provide a cloud-based service that gets you 100 MN/s. If you just want to buy a powerful server, check them out.
Introduction
I want to build a chess supercompter. I call it a supercomputer just because it should have a much higher level of performance than my home computers.
Before I go any further, let me be clear that I have no real use for a chess supercompter. Most of my game analysis is done in a Lichess study in my browser. Or, sometimes I use a computer I have at my house. This is powerful enough for me. I am not a grandmaster, and I do not need the deep analysis that a grandmaster needs.
Having said that, I decided I would try to make a cluster of cloud-based servers, that all worked together to run stockfish at a very fast speed. I wanted to see how many MN/s I could get with this approach. Deep Blue, the first computer to beat a GM, had the ability to search 200 MN/s. I thought I would start by aiming for that.
Why did you want to climb Mount Everest?
Because it’s there - George Mallory
If I have no need for anything more powerful than what I have, why try to make something so powerful? Well, because I want to see if I can.
Testing Stockfish Performance
For all the benchmarks in this article, I used stockfish’s built-in benchmark tool. For consistency, I used a hash size of 128 and I searched 14 moves deep. The only thing I changed for each computer was the number of threads.
For example, I would run:
stockfish bench 128 12 14
This runs a test with 12 threads and a search depth of 14.
Fun fact, when dealing with these high performance machines, you may run into an upper limit of threads. Stockfish currently only supports 512 threads. I did not get anywhere close to this, but I wanted to point it out.
Benchmarking My Computers
I thought I would start by seeing what I was dealing with at home. I have a few different computers so I tested them all. For my home computers, they ranged from about 3 MN/s (Chrombook) to 9 MN/s (Macbook Air). A quick look at Lichess running in my browser showed about 0.9 MN/s, just for a reference point.
Last year I did create a Raspberry Pi Cluster of 4 Raspberry Pi computers grouped together. While I was hoping for big things, it only gives me about 2 MN/s. This was another case of “because it is there.”
Finding Cloud Servers
For this, I used Amazon Web Services, specifically the EC2 servers. I don’t know if this was the best (see way down below for alternatives), but it is what I know.
For my testing, I looked specifically at the compute optimized servers. This is how AWS describes them:
Compute Optimized instances are ideal for compute bound applications that benefit from high performance processors. Instances belonging to this family are well suited for batch processing workloads, media transcoding, high performance web servers, high performance computing (HPC), scientific modeling, dedicated gaming servers and ad server engines, machine learning inference and other compute intensive applications.
Seems like a good fit for my case. Specifically, I used the latest available version, which is the c6g. I think this is c for “compute” and 6g for “sixth generation”. The c7g servers are starting to roll out, but those are only in preview mode so I couldn’t use them. The c6g servers use “Custom built AWS Graviton2 Processor with 64-bit Arm Neoverse cores.”
In this “class” of server, there are different performance levels. Here are some of the servers I used:
| Name | CPUs | Memory | Price/Hour |
|---|---|---|---|
| c6g.medium | 1 | 2 GB | $0.04 |
| c6g.4xlarge | 16 | 32 GB | $0.55 |
| c6g.8xlarge | 32 | 64 GB | $1.10 |
| c6g.12xlarge | 48 | 96 GB | $1.60 |
| c6g.16xlarge | 64 | 128 GB | $2.20 |
These prices will likely change. You can read about on demand pricing here
Setting Up The First Server
AWS uses something called “Amazon Machine Images” or AMIs. These are pre-built configurations for server. When you are launching a new server, you just pick an AMI and it will create a new version of that server with all the configurations in place. I wanted to create a simple AMI for myself that has a few things:
- OpenMPI: For communicating between servers
- Stockfish: specifcally the cluster branch
- Custom SSH keys that will be shared with all the servers
First I needed to set up a “blank” server, then I could create the AMI.
Launching The First Server
From the AWS console, I went to my list of servers under EC2, and launched a new server.
I used the Amazon Linux 2 AMI, because it was “tuned for optimal performance on Amazon EC2”. Not exactly sure what that means, but it sounds like something I would like.
I started with the smallest c6g.medium size because I’m not going to be using this for any actual performance. I just want to get the configuration set up. This is also the cheapest.
I mostly just used the defaults when launching the service. I picked an existing security group, but you could create a new one here. More on setting up that security group later.
At the end, I had a new server running in the cloud. I could connect to it over SSH using the keypair that AWS generated.
ssh -i ~/.ssh/stockfish-keypair.pem ec2-user@3.444.555.66
Getting The Basics
There are a couple basic things I needed before I could install the software I needed:
sudo yum groupinstall 'Development Tools' -y
sudo yum install git -y
Install OpenMPI
MPI is the communication layer that lets stockfish work across multiple nodes. You might just need openmpi-devel but I installed both openmpi and openmpi-devel.
sudo yum install openmpi -y
sudo yum install openmpi-devel -y
sudo ln -s /usr/lib64/openmpi/bin/* /usr/local/bin/
mpirun --version
Install Stockfish
I followed my notes on how to install a cluster-based version of stockfish. Check that out for a few more details. Here are the commands I used:
git clone --branch cluster --single-branch https://github.com/official-stockfish/Stockfish.git stockfish-cluster
cd stockfish-cluster/src
make net
make ARCH=armv8 COMPILER=mpicxx clean build
sudo ln -s /home/ec2-user/stockfish-cluster/src/stockfish /usr/local/bin
Since I’m using such a small server, I did not parallelize the build, which would look something like make -j. When I tried the build would just time out and throw an error.
At this point you can run stockfish and see how it works.
New SSH Keys
Finally I wanted to create new SSH keys that could be used to communicate between nodes once I have many running at once. See this post for more details.
ssh-keygen -t rsa
cat ~/.ssh/id_rsa.pub >> ~/.ssh/authorized_keys
Using all the defaults for ssh-keygen will give you a new id_rsa and id_rsa.pub file. The second line adds that to the list of authorized keys, which will be needed later.
Creating the AMI
Now I have a server that is set up the way I want. I want the ability to make many more servers with all the same configuration. That way I won’t have to rebuild stockfish or any of the above steps.
To create the AMI, go to the running instance in AWS, then go to the Actions menu and choose to Create Image. I called it “stockfish-cluster” with a description of “Stockfish 14 Cluster with OpenMPI”. You can call it whatever you want.
The process took about 3-4 minutes. You can check the progress in the AWS Console under EC2 > Images > AMIs.
Once this is successful, you can terminate the server you just created. You will no longer be able to access that server, but you can always create a new server that acts the same way.
Configuring The Security Group
There is an extra step to allow the servers to communicate with each other, once you have more. It took me a long time to figure out how to get this working, but here is what I ended up with.
Basically you need to configure the security group that the servers will use to allow communication between servers within that group. By default they allow inbound SSH access, but for MPI to work you need more types of traffic.
To get to the configuration, go to EC2 > Network & Security > Security Groups and pick the security group you used. You may want to copy the name of the security group, you’ll need it later.
Then you need to add a rule for both inbound and outbound. You want “all traffic” from this security group to be allowed.
Launching New Bigger Servers
Now you are ready to launch any size server, and as many as you want. When you are launching the new servers, just use the AMI you created (under My AMIs) instead of one of Amazon’s defaults. Each server you launch this way will already have Stockfish and OpenMPI installed and ready to go.
Bigger Servers - Faster Benchmarks
The first thing I did was to check the performance of the different sizes of individual servers. Here is the performance of a single server in different sizes:
| Name | Threads | MN/s |
|---|---|---|
| c6g.medium | 16 | 1 |
| c6g.4xlarge | 48 | 20 |
| c6g.8xlarge | 96 | 57 |
| c6g.12xlarge | 144 | 103 |
| c6g.16xlarge | 192 | 146 |
For the number of threads, I found that using about 3x the number CPUs for the number of threads seemed to be the best performance. You want to use as many threads as you can, without causing the system to thrash. Read about why using too many threads hurts performance.
I probably could have tuned each one further to get a bit more performance, but I wanted to move on to clustering them together.
With the 16xlarge size, I got to 146 MN/s, so I’m already almost at my inital goal of 200 MN/s.
Cluster Time
Now I was ready to start up multiple servers and get them talking to each other. From AWS you can start one at a time, or, during the “Launch Server” setup, you can pick how many instances you want to do. I started with 2, but kept adding more until I got up to 8.
Once all the servers were up, there are a couple things you need to do before you can run stockfish. First, pick one as the “master” node. It doesn’t matter which one. You will SSH into this one and setup the cluster.
Test Connections
From the “master” node, you need to first SSH into each box individually. You should use the internal IP that AWS provides. Doing this adds the other nodes to the “known hosts” file, which you will need to have. Since you already set up the ssh keys, this is as simple as:
ssh 172.31.18.64
Create Cluster Hosts File
Now that you can connect, you need to tell MPI what nodes you are going to use. To do this, create a file called cluster_hosts. The file is just a list of IP addresses, starting with 127.0.0.1 for the “master” node you are on. You can add more information to this file, like how many processes to run. But for this test you just need the IP addresses.
Mine looked like this:
127.0.0.1
172.31.18.64
172.31.22.142
172.31.23.78
Just keep adding all of the servers you want to connect to.
Running Stockfish
Finally, the moment of truth. Here is the command to run:
mpirun --hostfile cluster_hosts -map-by node -np 6 /usr/local/bin/stockfish
The -np 6 should match the number of nodes. Technically you could run multiple processes on each node, but I found just running one process on each node worked the best.
It should look like you just started one Stockfish process. Behind the scenes all the processing is being distributed among all the nodes of the cluster thanks to OpenMPI.
Cluster Benchmarks
Running multiple c6g.16xlarge servers, each with 64 CPUs, here are the results I got:
| # Servers | MN/s |
|---|---|
| 1 | 146 |
| 3 | 303 |
| 6 | 540 |
| 8 | 780 |
I stopped after 8, because I ran into an AWS limit where I can only have 512 CPUs. I could get that expanded if I wanted, but I did not see the need as I was already more than three times my initial goal of 200 MN/s.
There is some overhead to deal with the communication between all the nodes, so doubling the number of servers doesn’t double the performance. But it is still crazy high.
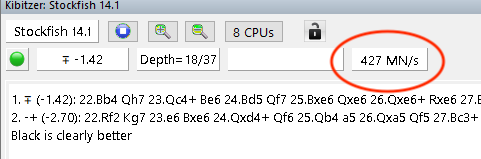
For the 8 servers, it would cost me about $18 / hr to run them. Higher than I want to pay, but not bad for a supercomputer.
This whole experiment cost me less than $5 because I never had any of the servers running for very long.
Connecting Chessbase
If you want to try connecting Chessbase or another database, you will have to do a couple more steps. First, create a command that you can execute remotely. I just did something like this:
echo 'mpirun --hostfile /home/ec2-user/cluster_hosts -map-by node -np 8 /usr/local/bin/stockfish' > cluster
chmod +x cluster
sudo ln -s /home/ec2-user/cluster /usr/local/bin/cluster
Now you can just run the cluster command to start up MPI and get the cluster working.
From there you will need a way to connect Chessbase. You could try something like InBetween, but I used my own SshEngine.
Now What?
This was a fun exercise. If I wanted to keep going, there are a few things I would try.
First, I just used basic AWS EC2 instances. AWS has some special systems for this type of work like ParallelClusters or Elastic Fabric Adapter. These try to reduce the networking overhead so the cluster is more efficient. I’ve never tried them, but I would want to look into those more.
The other thing would be to try to tune some of the settings to get the most performance out of each box. I had each node, including the master, doing the processing. Would it be better to have the master node just coordinating the other worker nodes? I could also test to find the optimal hash sizes and thread counts for this size server, like what I did with my raspberry pi cluster performance.
If you try this, or if you have any other thoughts or questions, let me know on twitter.